What is VMware ESXi?
VMware ESXi Server is a virtualization software, that means that the VMware ESXi Server is a single physical server who can run multiple virtual machines simultaneously. Each of these virtual machines believes it is running on its own dedicated hardware, and they have the impression that they are separate from the rest of virtual machines, but they are actually on the same hardware which is controlled by VMware ESXi Server. This is an enterprise level virtualization tool which utilizes services that manage numerous virtual machines with greater reliability and efficiency than VMware’s more basic Server product.
The reason for this is because ESXi Server runs on „bare-metal.“ This essentially means that you install the ESXi Server software directly into the computer, without an operating system for it to run on top of.
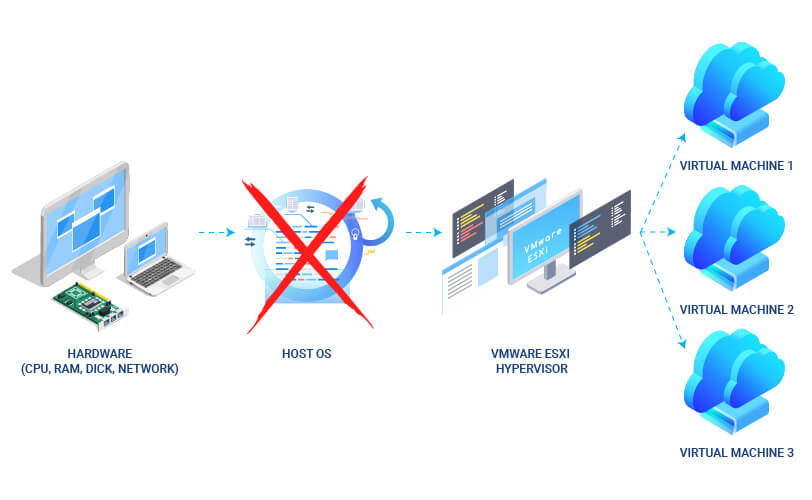
This system is managed by the VM Kernel, which is based on the Linux kernel. This microkernel saves resources by eliminating the overhead of running an underlying operating system beneath the virtual machines.
The product then divides up the resources from the physical hardware and simulates multiple copies of virtual hardware for the virtual machines to use.
It even has the capability to over-commit memory, meaning the total memory of the virtual machines can safely exceed the actual physical memory of the server. This can make for increased overall memory utilization in your servers.
How to create a Virtual Machine on VMware ESXi
Prerequisite for creating Virtual Machines are to have installed VMware ESXi server software on your computer or server (for this purpose we will use VMware ESXi 6.5.0, Build 8294253).
2. To create a virtual machine, in the Virtual Machines TAB click Create / Register VM. On the New Virtual Machine dialog box, select Create a new virtual machine and click Next.
3. Type a Name of your Virtual Machine in the textbox, from drop down menu select Compatibility, Guest OS family, Guest OS version and click
Note: selecting the latest version from Compatibility is recommended if you are not going to migrate to an older version of ESX/ESXi.
6. Check all information and options, if is everything OK, click Finish to end the wizard and wait until the VM has been created.
7. Click on Power on button in order to start your VM.
8. To start installing the OS click on the Console button, then on Open browser console and follow the OS installation wizard to install the OS on your VM.
On your main screen you will notice the information that VMware Tools are not installed, click on Action bottom, then Guest OS and then Install VMware Tools.
To create a mount point, run:
mkdir /mnt/cdrom
mount /dev/cdrom /mnt/cdrom
cd /mnt/cdrom/
ls
Please note that based on your package version you will have to adjust the command.
cd /tmp
tar -zxvf VMwareTools-10.2.1-8267844.tar.gz
cd vmware-tools-distrib
./vmware-install.pl
Related Posts |

Hardly any news feed appeared in the last few days without updates on ChatGPT – for experts an easy read, for the most readers hard to understand. With this post on the BIENE IT blog, we want to give you a brief overview of the hype issue and summarize the most important information about the…

IT security is becoming more and more important in the business environment. There are many reasons for this change. On the one side, the Corona pandemic favoured remote working, and on the other, the trend towards new work structures emerged years ago. Known as New Work, this way of working refers to location-independent labour, whether…

What is SD-WAN? SD-WAN or Software defined WANis a software-defined approach to managing wide-area network (WAN). This means that SD-WAN automatically determines the most efficient way to route traffic between branches and data locations. Powerful Software enables Information Technology (IT) and network engineers’ employees to remotely program edge devices, reduce delivery times and minimize or…


